Spot Spoofing Like the Pros
August 25, 2020

Last month, we talked about checking a sender’s email address to help identify phishing attacks. If the sender’s address is obviously incorrect, then you can confidently know that an email is phishing. This doesn’t mean that a message is always legitimate if the sender’s email address looks accurate.
In rare instances, email attackers can take it to the next level by spoofing the sender address.
This article is going to be more technical than usual, and will have three sections:
- What is email spoofing?
- The Simple Option: How to send an email header to IT.
- The Advanced Option: How to read an email header.
What is Email Spoofing?
Last week, the Information Security team investigated a Biola email account that was reportedly sending out phishing emails to steal money. Our assumption was that an attacker had logged in to the account with stolen credentials, and was using the Biola account to send phishing messages. Upon investigation, we found no signs of phishing, and no one had even used the account that week. It turns out that the Biola email address was being spoofed.
Email spoofing means that an attacker is impersonating you by pretending to send an email from your email address. The recipient of the email will see your address instead of the address it was actually sent from. If attackers know what they’re doing, they can spoof anyone’s email address.
Simple: Send IT the Email Header
Every email has two parts: the part that you see, and the hidden part (called the email “header” or the “original message”). If you suspect that an email message is malicious, the header is a reliable way to verify where an email actually came from. The part we’re about to show you gets a little technical, but it’s worth learning if you want to spot spoofing like the pros.
To view the email header in Gmail:
- Open the email message.
- Click the More icon (three vertical dots) at the top right.
- Select “Show original” from the list.

Here's what you'll see:

To share the header with IT:
- On this page, click Copy to clipboard.
- Paste the content into a new email message.
- Send the email to phishing@biola.edu, and explain your concern.
We can analyze it for you, and determine if the email address is being spoofed. But if you want to learn to spot spoofing like the pros, read on.
Advanced: How to Read an Email Header
Every header can be a little bit different, based on how the email was sent. When analyzing a header, here are a some fields you can examine for red flags:
- X-Sender: A field like this will contain the actual sending email address of the attacker. If the message is spoofed, you’ll see something different here than the sender’s displayed address.
- Reply-to: This field contains the address that all replies will be sent to. It should contain the trusted email address of the sender. If it contains a completely different email address, you should be suspicious. Note that business and marketing communications are likely to use a different reply-to email address than they are sent from. This is normal.
- X-Originating IP: This IP address won’t be immediately helpful, but you can paste it into an IP analyzer tool to determine the geographical origin of the sender.
- Received: From: This field will contain the sender's real email address or IP address (you can check the IP using the analyzer tool). It should also match the Received-SPF field. Be cautious if they don’t match, and if no explanation is provided.
- Received-SPF: Sender Policy Framework (SPF) is a way for a domain (e.g., biola.edu) to specify what servers are permitted to send mail on its behalf. This field will begin with a label, and often a brief explanation. Here are some possible examples:
- Pass: This is a good sign, and a strong indicator that the sender is legitimate. You might notice that the domains listed under “Received” and “Received-SPF” don’t match, but the latter field will say “Pass,” and give a note that the sender’s domain has been approved to send on their behalf.
- Softfail: A “Softfail” might come with an explanation, but is still suspicious. Consider reaching out to the sender via a known channel of communication.
- Fail: This is a bad sign. At best, it means that the sender’s mail service isn’t reputable. At worst, it means that the email is being spoofed.
- None: This means that the receiving email server didn’t find a record of permitted or denied sender hosts. This is suspicious as well.
First, here’s an example of a legitimate email, sent from one Biola employee (Stephanie) to another (David).
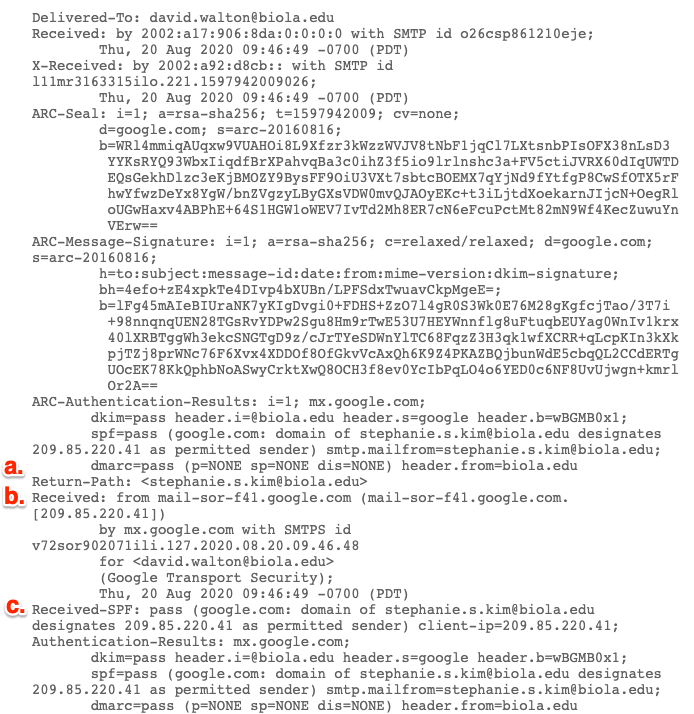
Everything checks out! Here’s how we can tell:
- The Return-Path is Stephanie’s address. This tells you that any replies to this email will go to Stephanie, and not another account.
- The Received: From line doesn’t seem very helpful at first glance. Stephanie’s email address isn’t mentioned. But if you look up the IP address (209.85.220.41), it gives information about Google’s headquarters in Mountainview, CA, and it’s referenced in the next field.
- The Received-SPF is pass! That’s a good sign. Here we see that the IP address above (209.85.220.41) is a “permitted sender.” All mail coming from @biola.edu accounts will be handled by Google, since they provide our email service.
Now, let’s look at another example, a real instance of email spoofing from a couple of years ago. In this instance, an attacker posing as a Biola employee asked someone at another university to wire money — to the attacker’s bank account. In this example, the email appears to be coming from “susan.kaneshiro@biola.edu,” but it isn’t.

Right off the bat, you’ll notice that this header has different information. Here’s what to pay attention to:
- The X-Originating IP (197.242.118.190) immediately reveals a red flag: This email was sent from Nigeria! There are a number of Biola students and employees who are from Nigeria, but the likelihood of a coworker’s email originating from another country is small.
- The X-Sender doesn’t match the “From” address. Even though the email looks like it’s coming from susan.kaneshiro@biola.edu, it’s actually coming from hamilton@arbitronentinc.com!
- Interestingly, the Reply-To doesn’t match either of the addresses that came before it. Any replies to this email will actually be sent to presidentmillz5512@gmail.com. This is why if you receive a suspicious email, it’s always best to contact the sender through a different, known channel of communication — like their phone number — rather than replying to the suspicious email.
Now you know how to access an email’s header, and you have the tools to determine the true origin of email messages. As always, you can contact information.security@biola.edu if you have questions about the legitimacy of an email message.